
A very basic renter-friendly bathroom update
- justjennaish
- Oct 10, 2018
- 5 min read
Updated: Jun 16, 2019
Hi there bathroom loving friends! Ya know, all of you.
I’ve lived in my fair share of rental houses with ugly and/or uninteresting bathrooms and I can tell you, it took its toll on me to have to be in their presence many times on a daily basis. Hardest thing ever. #firstworldproblems
(Please note: I actually can very happily live in ugly places, I am always thankful for shelter and food and every good thing. But this is a blog post about a bathroom makeover so pls indulge me a little).
Today I thought I’d share a little before/after of our current bathroom and a few little things that I have learned about how you can upgrade a bathroom you might not like, on a budget, and in a very temporary way (so you can do it even if you’re renting!). A lot of these tips may be useful for not just your bathroom, but other rooms in your house too. So basically, take whatever you want to out of this blog post.
We are not renting but we also don’t own our house (figure that one out!), so we couldn’t do too much by way of improving this little room. However the few things we did do have made a nice difference. Our bathroom is far from the dream, but it’s also a good distance away from where we started. Also, please keep in mind that I am by no means an interior designer and my taste may not be your taste.
Without further ado, here are some photos of what the bathroom looked like originally:


Heeeey 70s, how ya doin’?
The bathroom was completely functional and very clean, there was just a lot going on visually. The floor tiles are actually gorgeous and I love them on their own. I also love the detailing on the wall tiles… they just don’t really work together (in my opinion), especially when you throw in that lovely blue tiling around the shower base. The mottled, bottle green glass of the shower is really beautiful, but the shower frame is dated and clunky. The vanity is chunky and only has one leg. As you can see in these images, there are just a lot of different colours and textures… look, there is just a lot happening.
For multiple reasons we didn’t want to / couldn’t do anything permanent in this bathroom, so we opted for some temporary solutions based on techniques we have used in previous homes we’ve rented. Here are some photos of the bathroom after we changed only a few things (literally only a tiny amount of things), and the difference is obvious:


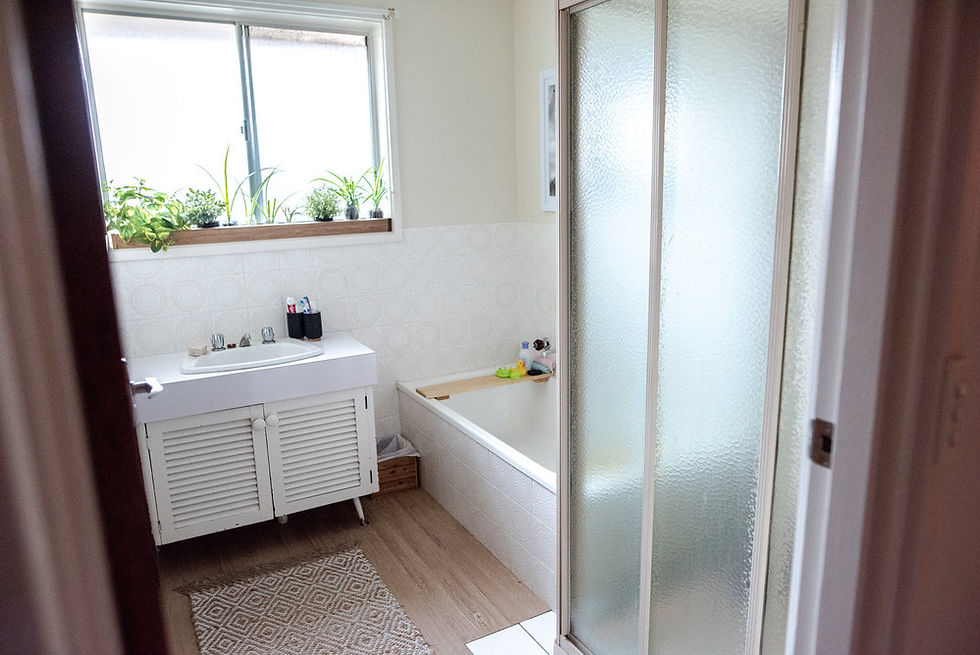
The room now feels a lot brighter and more airy. It is neutral and less confusing to the eye, but there is still a bit of character and personality there - the kind that you get with an old house. The old-school features like the wall tiling and vanity now look and feel more intentional rather than accidentally placed. There’s a lot that isn’t perfect, but it’s a lot more pleasant a space to exist in day-to-day!
And the best part is that these improvements were super easy, affordable and completely temporary. At any point we can remove it all and go back to the way the bathroom was before we started. Hooray!
Here are the really simple things we changed:
I should note that ‘we’ refers to either myself or my sister-in-law, with whom we share the house and live. My husband has little to no interest in these sorts of projects, haha.
1) Covered the floor tiles with vinyl planks
These days there are so many affordable and temporary options for covering floor you don’t like. We covered the bathroom tiles with 5mm loose lay vinyl planks that we had left over from covering the kitchen/dining area. These ones are designed to stay put with friction from the floor and the backing, so that means they can be laid easily without adhesive of any kind (as long as you have a clean, relatively flat level surface). We got ours from carpettiles1 (click to check out their site) in the colour KW6068. Bunnings also has these peel and stick vinyl planks and these vinyl rolls which you can use to cover your floors. There are also loads of other sites that sell peel and stick vinyl tiles in all sorts of designs and colours, so you can get the floor you want without having to commit to anything permanent. Just Google it.
2) Covered the tiles around the shower with sticky-back plastic
Sticky-back plastic is my favourite renter-friendly decorative tool ever. Think contact paper but thicker, stickier, and designed to adhere to surfaces in your home to instantly transform a space. My favourite supplier is Vinyl Home NZ (click to see their site!) who I have purchased from multiple times throughout our renting history. You can get plain colours in matte or gloss finishes, you can get wood looks, textures, metallics… errythang. You can even get self adhesive tiles. Nice. Our fridge is covered in one of their wood look vinyls and I love it. Anyway, I used a plain matte white to cover up those random blue tiles around the shower base. Water resistant and good as new!
3) Added some plants
Plants make any space feel more relaxed, I think. The addition of greenery to the window sill just draws the eye there as a focal point, and takes attention away from the other less-than-perfect things in the room. My sister in law, who has an exceptional eye for interior spaces, suggested this one and boy was it a good idea. The planter box was easy to whip up with some $2 cypress planks from Bunnings and the plants are all either fake or very hardy, low maintenance varieties that I hope I won’t kill.
4) Chucked in some simple timber accents
Because timber. Because warmth and natural vibes. Because it’s really handy to have a bath shelf for all the kids’ bath toys, and because a timber crate is more fun than a regular bin.
5) Introduced colour through towels
Towels hanging visibly on a rail are a nice way to bring in colours that you want to incorporate, or patterns, or textures. Use this to your advantage if you can, I say!
6) Hung some art
Nothing says ‘generic’ more than this buffalo print from Kmart, but I will replace it with a personal photograph soon. Anyway, I really like art in bathrooms for some reason - it’s just a little bit unexpected and interesting, and this space above the bath was calling for something. The adjacent wall will also get some small frames at some point. Again, this is about attracting the eye to minimise the impact of the other, less attractive features in the room. It’s also a good way to bring in colour, or to tie colours in a room together.
7) Switched out the taps
Admittedly, we didn’t do much here, just changed literally two taps (and that was because they were leaking, not because we decided to change them for aesthetic reasons!). But switching out hardware is an easy, high impact way to change the whole feel of a bathroom.
8) Threw down a rug
Because rugs are really the best thing ever. This is, for me, what pulls it all together. I love me a nice natural toned, fringed rug. I got this one from Aurugs but there are definitely cheaper ones at Kmart / on Gumtree / anywhere. Discovered that after I bought it. Just make sure you use a non-slip mat under any rug you use in a bathroom.


Anywho, I hope this post has been helpful for some of you, or inspiring in some way! If you have any other ideas that you use in rentals to spruce up the place, I’d really love to hear them. I think I will always prefer the temporary solutions ‘cause I love changing things up from time to time and the easier that is, the better… right?
Have a lovely day!
love, Jenna
Comments